7) Git for good programming practices, cont.
Last class, we went over many basics of Git, including the main concept of staging and committing. Questions?
The Git Staging Area
The Git Commit Workflow
Ignoring Things
What if we have files that we do not want Git to track for us, like backup files created by our editor or intermediate files created during data analysis? Let’s create a few dummy files:
$ mkdir results
$ touch a.dat b.dat c.dat results/a.out results/b.out
and see what Git says:
$ git status
On branch master
Untracked files:
  (use "git add <file>..." to include in what will be committed)

    a.dat
    b.dat
    c.dat
    results/
nothing added to commit but untracked files present (use "git add" to track)
Putting these files under version control would be a waste of disk space. What’s worse, having them all listed could distract us from changes that actually matter, so let’s tell Git to ignore them.
We do this by creating a file in the root directory of our project
called .gitignore:
and adding ~~~ *.dat results/ ~~~
These patterns tell Git to ignore any file whose name ends in .dat
and everything in the results directory. (If any of these files were
already being tracked, Git would continue to track them.)
Once we have created this file, the output of git status is much
cleaner:
On branch master
Untracked files:
  (use "git add <file>..." to include in what will be committed)

    .gitignore
nothing added to commit but untracked files present (use "git add" to track)
The only thing Git notices now is the newly-created .gitignore file.
You might think we wouldn’t want to track it, but everyone we’re sharing
our repository with will probably want to ignore the same things that
we’re ignoring. Let’s add and commit .gitignore:
$ git add .gitignore
$ git commit -m "Ignore data files and the results folder."
$ git status
# On branch master
nothing to commit, working directory clean
As a bonus, using .gitignore helps us avoid accidentally adding to
the repository files that we don’t want to track:
$ git add a.dat
The following paths are ignored by one of your .gitignore files:
a.dat
Use -f if you really want to add them.
If we really want to override our ignore settings, we can use
git add -f to force Git to add something. For example,
git add -f a.dat.
We can also always see the status of ignored files if we want:
$ git status --ignored
On branch master
Ignored files:
 (use "git add -f <file>..." to include in what will be committed)

        a.dat
        b.dat
        c.dat
        results/

nothing to commit, working directory clean
Branches!
When you first start your project you will by default be on a branch
called master. Check for yourself with the following command, which
will show you all your branches.
$ git branch -a
If I now want to start adding a new feature, best practice is to start a new branch.
$ git checkout -b mercury
Switched to a new branch 'mercury'
The -b flag created the new branch and switched to it. At any time,
we can confirm that there are now two branches, master and
mercury, with git branch -a, which also highlights which branch
you are on.
Now let’s make changes to the branch.
$ echo "Mercury is the closest planet to our sun" > mercury.txt
$ git status
$ git add .
$ git commit -m 'Added first note re Mercury'
We can create multiple branches to work on different features, so let’s do that:
$ git checkout -b saturn
$ echo "Saturn is my favorite planet because of its beautiful rings" > saturn.txt
$ git status
$ git add .
$ git commit -m 'Added first note re Saturn'
FYI: by default, branches will be made based on master. You can base a
new branch off an existing branch with the command
git checkout -b <new-branch> <existing-branch>.
When I’m done with my changes on my local branch, I’m going to merge my master into my local branch. In this case, it is not strictly necessary because I know that I didn’t change the master.
$ git merge master
$ git checkout master
$ git branch -a
$ git merge saturn
$ git branch -d saturn
$ git branch -a
It is a good idea to clean up branches when you have finished making and then merging in the new feature.
Remotes in GitHub
Version control really comes into its own when we begin to collaborate with other people. We already have most of the machinery we need to do this; the only thing missing is to copy changes from one repository to another.
Systems like Git allow us to move work between any two repositories. In practice, though, it’s easiest to use one copy as a central hub, and to keep it on the web rather than on someone’s laptop. Most programmers use hosting services like GitHub, BitBucket or GitLab to hold those master copies; we’ll explore the pros and cons of this in the final section of this lesson.
Let’s start by sharing the changes we’ve made to our current project
with the world. Log in to GitHub, then click on the icon in the top
right corner to create a new repository called planets:

Creating a Repository on GitHub (Step 1)
Name your repository “planets” and then click “Create Repository”:
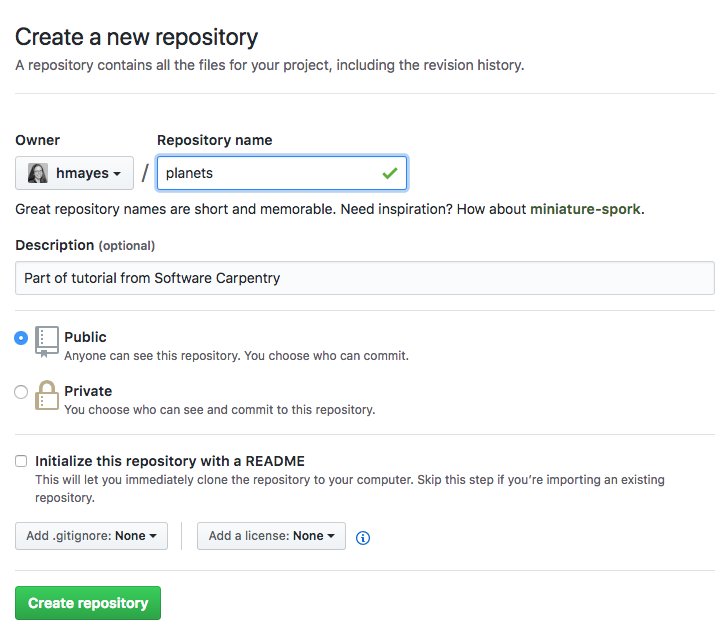
Creating a Repository on GitHub (Step 2)
As soon as the repository is created, GitHub displays a page with a URL and some information on how to configure your local repository:
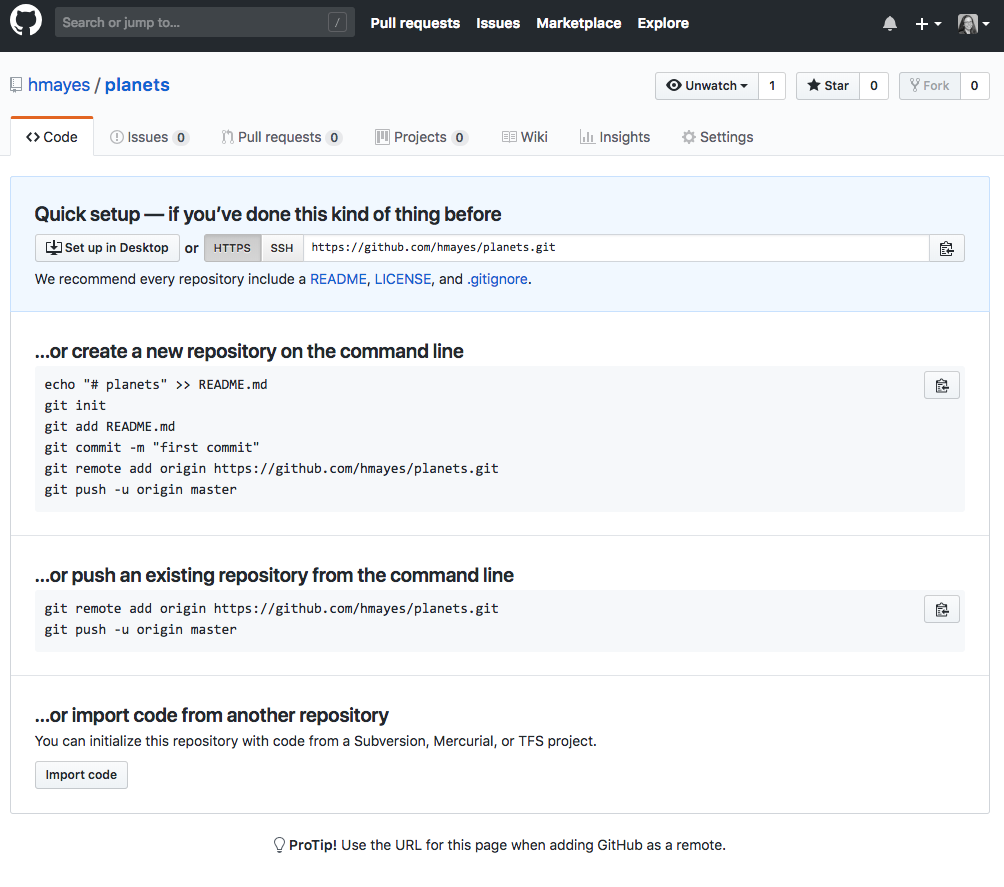
Creating a Repository on GitHub (Step 3)
This effectively does the following on GitHub’s servers:
$ mkdir planets
$ cd planets
$ git init
If you remember back when we added and commited our earlier work on
mars.txt, we had a diagram of the local repository which looked like
this:
The Local Repository with Git Staging Area
Now that we have two repositories, we need a diagram like this:
Freshly-Made GitHub Repository
Note that our local repository still contains our earlier work on
mars.txt, but the remote repository on GitHub appears empty as it
doesn’t contain any files yet.
The next step is to connect the two repositories. We do this by making the GitHub repository a remote for the local repository. The home page of the repository on GitHub includes the string we need to identify it:

Where to Find Repository URL on GitHub
Click on the ‘HTTPS’ link to change the protocol from SSH to HTTPS.
FYI: HTTPS vs. SSH
We use HTTPS here because it does not require additional configuration. Later you may want to set up SSH access, which is a bit more secure, by following one of the great tutorials from GitHub, Atlassian/BitBucket and GitLab (this one has a screencast).
Back to the remote
Copy the the URL above from the browser, go into the local planets
repository, and run this command:
$ git remote add origin https://github.com/vlad/planets.git
Make sure to use the URL for your repository rather than Vlad’s: the
only difference should be your username instead of vlad.
We can check that the command has worked by running git remote -v:
origin   https://github.com/vlad/planets.git (push)
origin   https://github.com/vlad/planets.git (fetch)
The name origin is a local nickname for your remote repository. We
could use something else if we wanted to, but origin is by far the
most common choice.
Once the nickname origin is set up, this command will push the
changes from our local repository to the repository on GitHub:
$ git push origin master
Counting objects: 9, done.
Delta compression using up to 4 threads.
Compressing objects: 100% (6/6), done.
Writing objects: 100% (9/9), 821 bytes, done.
Total 9 (delta 2), reused 0 (delta 0)
To https://github.com/vlad/planets
 * [new branch]      master -> master
Branch master set up to track remote branch master from origin.
The git branch -a command from earlier will display both your local
and remote branches.
FYI: Network Proxies
If the network you are connected to uses a proxy, there is a chance that your last command failed with “Could not resolve hostname” as the error message. To solve this issue, you need to tell Git about the proxy:
$ git config --global http.proxy http://user:password@proxy.url
$ git config --global https.proxy http://user:password@proxy.url
When you connect to another network that doesn’t use a proxy, you will need to tell Git to disable the proxy using:
$ git config --global --unset http.proxy
$ git config --global --unset https.proxy
FYI on Password Managers
If your operating system has a password manager configured, git push
will try to use it when it needs your username and password. For
example, this is the default behavior for Git Bash on Windows. If you
want to type your username and password at the terminal instead of using
a password manager, type:
$ unset SSH_ASKPASS
in the terminal, before you run git push. Despite the name, git
uses ``SSH_ASKPASS` for all credential
entry <https://git-scm.com/docs/gitcredentials#_requesting_credentials>`__,
so you may want to unset SSH_ASKPASS whether you are using git via
SSH or https.
You may also want to add unset SSH_ASKPASS at the end of your
~/.bashrc to make git default to using the terminal for usernames
and passwords.
Back to our local and remote repositories
They are now in this state:
GitHub Repository After First Push
We can pull changes from the remote repository to the local one as well:
$ git pull origin master
From https://github.com/vlad/planets
 * branch            master     -> FETCH_HEAD
Already up-to-date.
Pulling has no effect in this case because the two repositories are already synchronized. If someone else had pushed some changes to the repository on GitHub, though, this command would download them to our local repository.
Collaborating
For the next step, get into pairs. One person will be the “Owner” and the other will be the “Collaborator”. The goal is that the Collaborator add changes into the Owner’s repository. We will switch roles at the end, so both persons will play Owner and Collaborator.
If you’re working through this lesson on your own, you can carry on by opening a second terminal window. This window will represent your partner, working on another computer. You won’t need to give anyone access on GitHub, because both ‘partners’ are you.
If you do have a partner, the Owner needs to give the Collaborator access. On GitHub, click the settings button on the right, then select Collaborators, and enter your partner’s username.
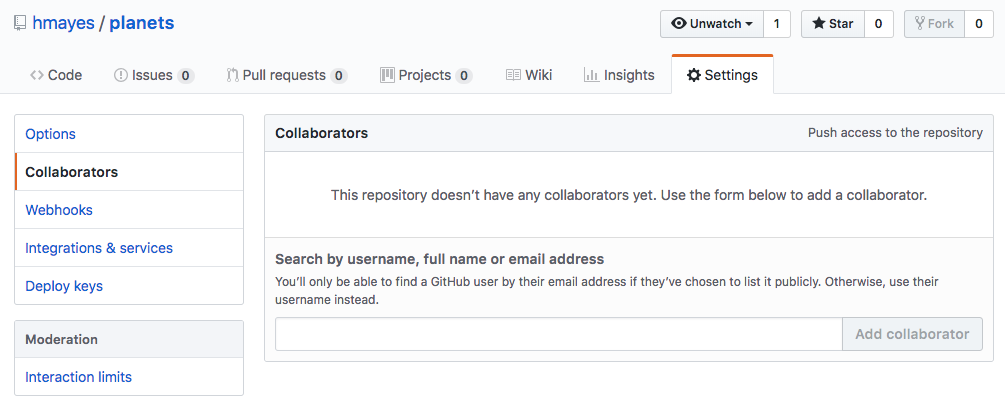
Adding Collaborators on GitHub
To accept access to the Owner’s repo, the Collaborator needs to go to https://github.com/notifications. Once there she can accept access to the Owner’s repo.
Next, the Collaborator needs to download a copy of the Owner’s
repository to her machine. This is called “cloning a repo”. To clone the
Owner’s repo into her Desktop folder, the Collaborator enters:
$ git clone https://github.com/vlad/planets.git ~/Desktop/vlad-planets
Replace ‘vlad’ with the Owner’s username.
After Creating Clone of Repository
The Collaborator can now make a change in her clone of the Owner’s repository, exactly the same way as we’ve been doing before. It is best practice to only make changes to a new branch:
$ cd ~/Desktop/vlad-planets
$ git checkout -b pluto
$ echo 'It is so a planet!' > pluto.txt
$ git add pluto.txt
$ git commit -m "Add notes about Pluto"
1 file changed, 1 insertion(+)
create mode 100644 pluto.txt
Then push the change to the Owner’s repository on GitHub, but as a new branch:
$ git push --set-upstream origin pluto
Take a look to the Owner’s repository on its GitHub website now (maybe you need to refresh your browser). You should be able to see that there is a new branch available. If you wish, you request that the branch be merged to master.
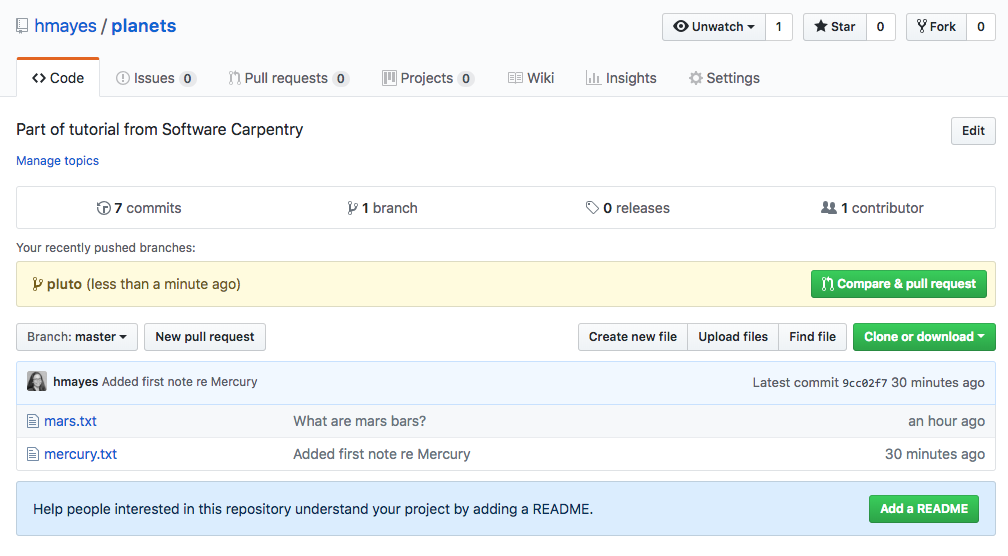
Request pull and merge
Now, you can describe the features that you added (optional) or any
other note for the owner to see before reviewing the request. You can
also see what has changed. 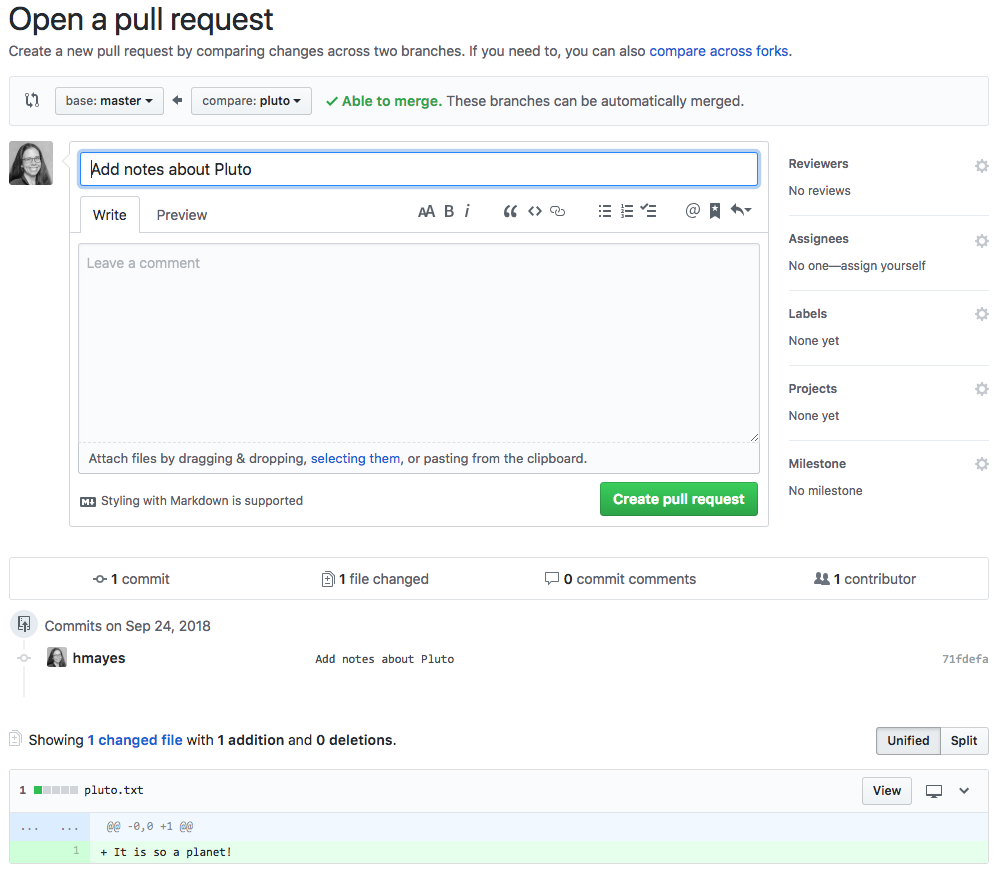
If there are no conflicts (e.g. someone else already made a different
file with the same name), you can review and accept. 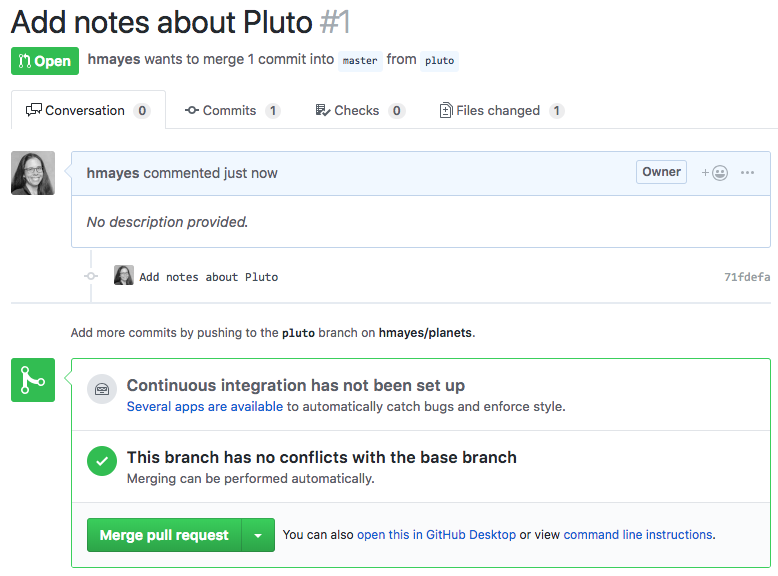
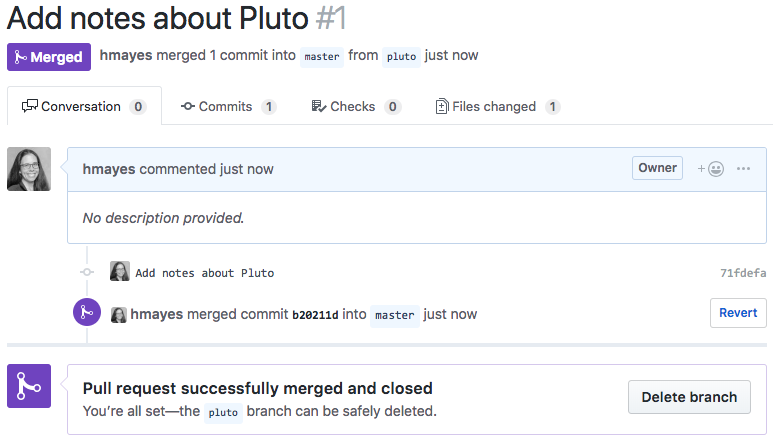
Success
We can delete the remote branch now, and the Collaborator can delete the
local branch pluto as well, if desired.
On the Owner’s local computer, to download the Collaborator’s changes from GitHub, the Owner now enters:
$ git pull origin master
Now the three repositories (Owner’s local, Collaborator’s local, and Owner’s on GitHub) are back in sync.
A Basic Collaborative Workflow
In practice, it is good to be sure that you have an updated version of
the repository you are collaborating on, so you should git pull
before making our changes. The basic collaborative workflow would be:
- update your local repo with
git pull origin master - create a branch on which to make changes
git checkout -b <new-feature> - make your changes and stage them with
git add - commit your changes with
git commit -m - check if there will be any conflicts with the master with
git merge masterand resolve if necessary (see below) - upload the changes to GitHub with
git push --set-upstream origin <new-feature> - request that the new branch it push origin master
- delete remote and local branches
It is better to make many commits with smaller changes rather than of one commit with massive changes: small commits are easier to read and review.
Comment Changes in GitHub
The Collaborator has some questions about one line change made by the Owner and has some suggestions to propose.
With GitHub, it is possible to comment the diff of a commit. Over the line of code to comment, a blue comment icon appears to open a comment window.
The Collaborator posts its comments and suggestions using GitHub interface.
Conflicts
As soon as people can work in parallel, they’ll likely step on each other’s toes. This will even happen with a single person: if we are working on a piece of software on both our laptop and a server in the lab, we could make different changes to each copy. Version control helps us manage these conflicts by giving us tools to resolve overlapping changes.
To see how we can resolve conflicts, we must first create one. The file
mars.txt currently looks like this in both partners’ copies of our
planets repository:
Cold and dry, but everything is my favorite color
The two moons may be a problem for Wolfman
But the Mummy will appreciate the lack of humidity
Let’s add a line to one partner’s copy only:
Cold and dry, but everything is my favorite color
The two moons may be a problem for Wolfman
But the Mummy will appreciate the lack of humidity
This line added to Wolfman's copy
and then push the change to GitHub:
$ git add mars.txt
$ git commit -m "Add a line in our home copy"
[master 5ae9631] Add a line in our home copy
 1 file changed, 1 insertion(+)
$ git push origin master
Counting objects: 5, done.
Delta compression using up to 4 threads.
Compressing objects: 100% (3/3), done.
Writing objects: 100% (3/3), 352 bytes, done.
Total 3 (delta 1), reused 0 (delta 0)
To https://github.com/vlad/planets
   29aba7c..dabb4c8  master -> master
Now let’s have the other partner make a different change to their copy without updating from GitHub:
Cold and dry, but everything is my favorite color
The two moons may be a problem for Wolfman
But the Mummy will appreciate the lack of humidity
We added a different line in the other copy
We can commit the change locally:
$ git add mars.txt
$ git commit -m "Add a line in my copy"
[master 07ebc69] Add a line in my copy
 1 file changed, 1 insertion(+)
but Git won’t let us push it to GitHub:
$ git push origin master
To https://github.com/vlad/planets.git
 ! [rejected]        master -> master (non-fast-forward)
error: failed to push some refs to 'https://github.com/vlad/planets.git'
hint: Updates were rejected because the tip of your current branch is behind
hint: its remote counterpart. Merge the remote changes (e.g. 'git pull')
hint: before pushing again.
hint: See the 'Note about fast-forwards' in 'git push --help' for details.
The Conflicting Changes
Git rejects the push because it detects that the remote repository has new updates that have not been incorporated into the local branch. What we have to do is pull the changes from GitHub, merge them into the copy we’re currently working in, and then push that. Let’s start by pulling:
$ git pull origin master
remote: Counting objects: 5, done.
remote: Compressing objects: 100% (2/2), done.
remote: Total 3 (delta 1), reused 3 (delta 1)
Unpacking objects: 100% (3/3), done.
From https://github.com/vlad/planets
 * branch            master     -> FETCH_HEAD
Auto-merging mars.txt
CONFLICT (content): Merge conflict in mars.txt
Automatic merge failed; fix conflicts and then commit the result.
The git pull command updates the local repository to include those
changes already included in the remote repository. After the changes
from remote branch have been fetched, Git detects that changes made to
the local copy overlap with those made to the remote repository, and
therefore refuses to merge the two versions to stop us from trampling on
our previous work. The conflict is marked in in the affected file:
$ cat mars.txt
Cold and dry, but everything is my favorite color
The two moons may be a problem for Wolfman
But the Mummy will appreciate the lack of humidity
<<<<<<< HEAD
We added a different line in the other copy
=======
This line added to Wolfman's copy
>>>>>>> dabb4c8c450e8475aee9b14b4383acc99f42af1d
Our change is preceded by <<<<<<< HEAD. Git has then inserted
======= as a separator between the conflicting changes and marked
the end of the content downloaded from GitHub with >>>>>>>. (The
string of letters and digits after that marker identifies the commit
we’ve just downloaded.)
It is now up to us to edit this file to remove these markers and reconcile the changes. We can do anything we want: keep the change made in the local repository, keep the change made in the remote repository, write something new to replace both, or get rid of the change entirely. Let’s replace both so that the file looks like this:
Cold and dry, but everything is my favorite color
The two moons may be a problem for Wolfman
But the Mummy will appreciate the lack of humidity
We removed the conflict on this line
To finish merging, we add mars.txt to the changes being made by the
merge and then commit:
$ git add mars.txt
$ git status
On branch master
All conflicts fixed but you are still merging.
  (use "git commit" to conclude merge)

Changes to be committed:

    modified:   mars.txt
$ git commit -m "Merge changes from GitHub"
[master 2abf2b1] Merge changes from GitHub
Now we can push our changes to GitHub:
$ git push origin master
Counting objects: 10, done.
Delta compression using up to 4 threads.
Compressing objects: 100% (6/6), done.
Writing objects: 100% (6/6), 697 bytes, done.
Total 6 (delta 2), reused 0 (delta 0)
To https://github.com/vlad/planets.git
   dabb4c8..2abf2b1  master -> master
Git keeps track of what we’ve merged with what, so we don’t have to fix things by hand again when the collaborator who made the first change pulls again:
$ git pull origin master
remote: Counting objects: 10, done.
remote: Compressing objects: 100% (4/4), done.
remote: Total 6 (delta 2), reused 6 (delta 2)
Unpacking objects: 100% (6/6), done.
From https://github.com/vlad/planets
 * branch            master     -> FETCH_HEAD
Updating dabb4c8..2abf2b1
Fast-forward
 mars.txt | 2 +-
 1 file changed, 1 insertion(+), 1 deletion(-)
We get the merged file:
Cold and dry, but everything is my favorite color
The two moons may be a problem for Wolfman
But the Mummy will appreciate the lack of humidity
We removed the conflict on this line
We don’t need to merge again because Git knows someone has already done that.
Git’s ability to resolve conflicts is very useful, but conflict resolution costs time and effort, and can introduce errors if conflicts are not resolved correctly. If you find yourself resolving a lot of conflicts in a project, consider these technical approaches to reducing them:
- Pull from upstream more frequently, especially before starting new work
- Use topic branches to segregate work, merging to master when complete
- Make smaller more atomic commits
- Where logically appropriate, break large files into smaller ones so that it is less likely that two authors will alter the same file simultaneously
Conflicts can also be minimized with project management strategies:
- Clarify who is responsible for what areas with your collaborators
- Discuss what order tasks should be carried out in with your collaborators so that tasks expected to change the same lines won’t be worked on simultaneously
- If the conflicts are stylistic churn (e.g. tabs vs. spaces),
establish a project convention that is governing and use code style
tools (e.g.
htmltidy,perltidy,rubocop, etc.) to enforce, if necessary
FYI: If you want to add to a project on which you are not a
collaborator, you can instead
`fork <https://help.github.com/articles/fork-a-repo/>`__ the repo,
and eventually even ask the original project owner if they want to
incorporate your changes.
Note: you can still copy any public repo even if you are not listed as a collaborator. Case in point, this class!
All ipynb for this course, except for solved assignments, will be publicly available at: https://github.com/team-mayes/che_696
I work on my local computer, make commits as desired, and when ipynbs
are in a mostly final stage, I push them to this public repository. The
easiest way for you to get copies of these notebooks are for you to
clone the repo, e.g.:
git clone https://github.com/team-mayes/che_696.git che_696_mayes
Then, shortly before each class make sure you are up-to-date with recent edits by using:
git pull
Open Science
The opposite of “open” isn’t “closed”. The opposite of “open” is “broken”.
—John Wilbanks
Free sharing of information might be the ideal in science, but the reality is often more complicated. Normal practice today looks something like this:
- A scientist collects some data and stores it on a machine that is occasionally backed up by her department.
- She then writes or modifies a few small programs (which also reside on her machine) to analyze that data.
- Once she has some results, she writes them up and submits her paper. She might include her data—a growing number of journals require this—but she probably doesn’t include her code.
- Time passes.
- The journal sends her reviews written anonymously by a handful of other people in her field. She revises her paper to satisfy them, during which time she might also modify the scripts she wrote earlier, and resubmits.
- More time passes.
- The paper is eventually published. It might include a link to an online copy of her data, but the paper itself will be behind a paywall: only people who have personal or institutional access will be able to read it.
For a growing number of scientists, though, the process looks like this:
- The data that the scientist collects is stored in an open access repository like figshare or Zenodo, possibly as soon as it’s collected, and given its own Digital Object Identifier (DOI). Or the data was already published and is stored in Dryad.
- The scientist creates a new repository on GitHub to hold her work.
- As she does her analysis, she pushes changes to her scripts (and possibly some output files) to that repository. She also uses the repository for her paper; that repository is then the hub for collaboration with her colleagues.
- When she’s happy with the state of her paper, she posts a version to arXiv or some other preprint server to invite feedback from peers.
- Based on that feedback, she may post several revisions before finally submitting her paper to a journal.
- The published paper includes links to her preprint and to her code and data repositories, which makes it much easier for other scientists to use her work as starting point for their own research.
This open model accelerates discovery: the more open work is, the more widely it is cited and re-used.
However, people who want to work this way need to make some decisions about what exactly “open” means and how to do it. You can find more on the different aspects of Open Science in this book.
This is one of the (many) reasons we teach version control. When used diligently, it answers the “how” question by acting as a shareable electronic lab notebook for computational work:
- The conceptual stages of your work are documented, including who did what and when. Every step is stamped with an identifier (the commit ID) that is for most intents and purposes unique.
- You can tie documentation of rationale, ideas, and other intellectual work directly to the changes that spring from them.
- You can refer to what you used in your research to obtain your computational results in a way that is unique and recoverable.
- With a version control system such as Git, the entire history of the repository is easy to archive for perpetuity.
Licensing
When a repository with source code, a manuscript or other creative works
becomes public, it should include a file LICENSE or LICENSE.txt
in the base directory of the repository that clearly states under which
license the content is being made available. This is because creative
works are automatically eligible for intellectual property (and thus
copyright) protection. Reusing creative works without a license is
dangerous, because the copyright holders could sue you for copyright
infringement.
A license solves this problem by granting rights to others (the licensees) that they would otherwise not have. What rights are being granted under which conditions differs, often only slightly, from one license to another. In practice, a few licenses are by far the most popular, and choosealicense.com will help you find a common license that suits your needs. Important considerations include:
- Whether you want to address patent rights.
- Whether you require people distributing derivative works to also distribute their source code.
- Whether the content you are licensing is source code.
- Whether you want to license the code at all.
Choosing a license that is in common use makes life easier for contributors and users, because they are more likely to already be familiar with the license and don’t have to wade through a bunch of jargon to decide if they’re ok with it. The Open Source Initiative and Free Software Foundation both maintain lists of licenses which are good choices.
This article provides an excellent overview of licensing and licensing options from the perspective of scientists who also write code.
At the end of the day what matters is that there is a clear statement as to what the license is. Also, the license is best chosen from the get-go, even if for a repository that is not public. Pushing off the decision only makes it more complicated later, because each time a new collaborator starts contributing, they, too, hold copyright and will thus need to be asked for approval once a license is chosen.
Citation
You may want to include a file called CITATION or CITATION.txt
that describes how to reference your project; the one for Software
Carpentry
states:
To reference Software Carpentry in publications, please cite both of the following:

Greg Wilson: "Software Carpentry: Getting Scientists to Write Better
Code by Making Them More Productive".  Computing in Science &
Engineering, Nov-Dec 2006.

Greg Wilson: "Software Carpentry: Lessons Learned". arXiv:1307.5448,
July 2013.

@article{wilson-software-carpentry-2006,
    author =  {Greg Wilson},
    title =   {Software Carpentry: Getting Scientists to Write Better Code by Making Them More Productive},
    journal = {Computing in Science \& Engineering},
    month =   {November--December},
    year =    {2006},
}

@online{wilson-software-carpentry-2013,
  author      = {Greg Wilson},
  title       = {Software Carpentry: Lessons Learned},
  version     = {1},
  date        = {2013-07-20},
  eprinttype  = {arxiv},
  eprint      = {1307.5448}
}
More detailed advice, and other ways to make your code citable can be found at the Software Sustainability Institute blog and in:
Smith AM, Katz DS, Niemeyer KE, FORCE11 Software Citation Working Group. (2016) Software citation principles. PeerJ Computer Science 2:e86 https://doi.org/10.7717/peerj-cs.86
There is also an
`@software{… <https://www.google.de/search?q=git+citation+%22%40software%7B%22>`__
BibTeX entry type in case no
“umbrella” citation like a paper or book exists for the project you want
to make citable.
Hosting
The second big question for groups that want to open up their work is where to host their code and data. One option is for the lab, the department, or the university to provide a server, manage accounts and backups, and so on. The main benefit of this is that it clarifies who owns what, which is particularly important if any of the material is sensitive (i.e., relates to experiments involving human subjects or may be used in a patent application). The main drawbacks are the cost of providing the service and its longevity: a scientist who has spent ten years collecting data would like to be sure that data will still be available ten years from now, but that’s well beyond the lifespan of most of the grants that fund academic infrastructure.
Another option is to purchase a domain and pay an Internet service provider (ISP) to host it. This gives the individual or group more control, and sidesteps problems that can arise when moving from one institution to another, but requires more time and effort to set up than either the option above or the option below.
The third option is to use a public hosting service like GitHub, GitLab,or BitBucket. Each of these services provides a web interface that enables people to create, view, and edit their code repositories. These services also provide communication and project management tools including issue tracking, wiki pages, email notifications, and code reviews. These services benefit from economies of scale and network effects: it’s easier to run one large service well than to run many smaller services to the same standard. It’s also easier for people to collaborate. Using a popular service can help connect your project with communities already using the same service.
As an example, Software Carpentry is on GitHub where you can find the source for this page. Anyone with a GitHub account can suggest changes to this text.
GitHub repositories can also be assigned DOIs, by connecting its
releases to
Zenodo. For
example, `10.5281/zenodo.57467 <https://zenodo.org/record/57467>`__
is the DOI that has been “minted” for the Software Carpentry
introduction to Git.
Using large, well-established services can also help you quickly take advantage of powerful tools. One such tool, continuous integration (CI), can automatically run software builds and tests whenever code is committed or pull requests are submitted. Direct integration of CI with an online hosting service means this information is present in any pull request, and helps maintain code integrity and quality standards. While CI is still available in self-hosted situations, there is much less setup and maintenance involved with using an online service. Furthermore, such tools are often provided free of charge to open source projects, and are also available for private repositories for a fee.
Institutional Barriers
Sharing is the ideal for science, but many institutions place restrictions on sharing, for example to protect potentially patentable intellectual property. If you encounter such restrictions, it can be productive to inquire about the underlying motivations and either to request an exception for a specific project or domain, or to push more broadly for institutional reform to support more open science.
Summary of key points from this notebook
- Version control is like an unlimited ‘undo’.
- Version control also allows many people to work in parallel.
git initinitializes a repository.- Git stores all of its repository data in the .git directory. Be really careful before deleting such a directory!
git statusshows the status of a repository.git addputs files in the staging area.git commitsaves the staged content as a new commit in the local repositorygit diffdisplays differences between commits.git checkoutrecovers old versions of files and switches between branches.git log --onelinedisplays one line describing each commit in the repo.- The
.gitignorefile tells Git what files to ignore. git branch -ashows all branches, both local and remote.git clonecopies a remote repository to create a local repository with a remote calledoriginautomatically set up.- Conflicts occur when two or more people change the same file(s) at the same time.
- The version control system does not allow people to overwrite each other’s changes blindly, but highlights conflicts so that they can be resolved.
- Open scientific work is more useful and more highly cited than closed.
- People who are not lawyers should not try to write licenses from scratch.
- Add a CITATION file to a repository to explain how you want your work cited.
- Projects can be hosted on university servers, on personal domains, or on public forges.